Satochip
A Satochip is a seed-bearing signing JavaCard. Unlike a SeedKeeper, which only stores secrets, a Satochip holds a BIP-32 seed and can derive keys and sign transactions and messages on the card. SeedSigner uses it as an extra signing device alongside the in-memory seed flows.
See also: Bundled JavaCard Applets and Smartcard integration and installation.
Official Satochip documentation — satochip.io/quick-start
Requirements and setup
- The Satochip applet flashed to a JavaCard (
SatoChip-0.12-official.cap). - Smartcard support and Satochip support enabled (both default Enabled) in Settings → Advanced.
- A supported reader.
The Satochip menu
Tools → Smartcard Tools → Satochip Functions
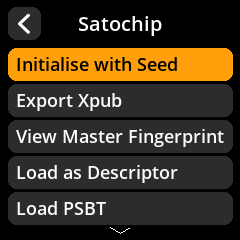
| Menu item | What it does |
|---|---|
| Initialise with Seed | Write a seed to the card (one time only) |
| Export Xpub | Export single-sig or multisig xpubs for a watch-only wallet |
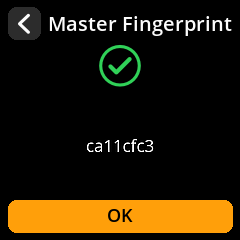
| View Master Fingerprint | Show the card’s master key fingerprint |
| Load as Descriptor | Build a single-sig descriptor from the card and use it in the Address Explorer |
| Load PSBT | Verify and sign a transaction with the card |
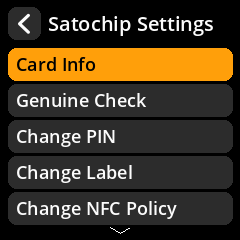
| Card Settings | Info, genuine check, PIN, label, NFC policy, factory reset |
| Advanced | 2FA, benchmarks, signing-bias check |
Initialising a Satochip with a seed
A Satochip can be seeded once. Seeding an already-seeded card fails; reset the card first if you need to change the seed.
- Have the seed loaded in SeedSigner (create one, scan a SeedQR, load from SeedKeeper, enter words, or recreate from SLIP-39).
- Tools → Smartcard Tools → Satochip Functions → Initialise with Seed.
- Continue past any Already Seeded warning (the card must be blank).
- Choose the seed from the Seed to Import list (loaded seeds appear at the top, fingerprinted; you can also scan or type a new one here).
- SeedSigner writes the seed to the card and shows Seed Imported.
The card is now seeded. View Master Fingerprint should match the seed’s fingerprint.
The card PIN is set the first time you use the card (a blank Satochip prompts for a New Card PIN). See Satochip card settings.
Exporting xpubs
Use Export Xpub to add the Satochip to a watch-only wallet.
- Satochip Functions → Export Xpub.
- Choose Single Sig or Multisig.
- Choose the script type (Native Segwit, Nested Segwit, Taproot, Legacy — depending on your Script types setting and the card’s capabilities).
- If BIP32 account prompt is enabled, choose the account number.
- Choose the coordinator / QR format, confirm the warning, and review the derivation details.
- The xpub is displayed as a QR code to scan into your wallet.
The derivation details screen lets you verify the path before exporting.
Using the card as a single-sig descriptor
Load as Descriptor builds a single-sig descriptor from the card’s master key. After choosing the script type (and derivation, if prompted), you land on the descriptor summary and can open the Address explorer — useful for verifying receive addresses against a wallet that watches the same key.
Signing a transaction with the card
- Scan a PSBT as normal (from a watch-only wallet that knows the card’s xpub).
- Satochip Functions → Load PSBT.
- Confirm the card is seeded and select the derivation.
- SeedSigner sends the transaction to the card for verification and signing.
The Satochip verifies the transaction on-card before signing. The signed result is returned as a PSBT QR to scan back into your wallet.
Message signing (proving address ownership) is available from Seeds → seed → Sign message with the Satochip selected as the signer.
Signing timeouts
Satochip signing is slow and deliberately randomised with dummy operations (see below). If signing times out on a slow device, increase Settings → Advanced → Satochip tx sign timeout / Satochip message sign timeout.
Card settings
Satochip Functions → Card Settings
| Item | Purpose |
|---|---|
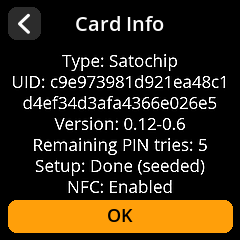
| Card Info | Card type, UID, versions, PIN tries, seed state, NFC policy |
| Genuine Check | Verify the card is genuine |
| Change PIN | Set a new card PIN |
| Change Label | Give the card a friendly name |
| Change NFC Policy | Enable / Disable / Block contactless |
| Factory Reset Card | Wipe the card (supported on Satochip v0.12-0.4 and later) |
Advanced
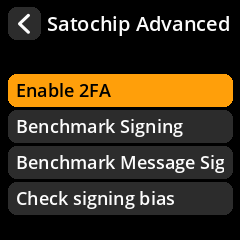
Enable 2FA
Enable 2FA requires a one-time password (HMAC) alongside the PIN for signing. You can set an amount limit (in satoshis) above which 2FA is required. The 2FA secret is shown for you to record; if you lose it you cannot sign above the limit.
Benchmarks
Benchmark Signing and Benchmark Message Signing run repeated operations and report minimum/average/maximum timing. Useful for tuning the signing timeouts on a particular device or card.
Check signing bias
Satochip’s dummy-transaction signing (below) can be checked for bias in the resulting signatures with Check signing bias.
Dummy signing and timing (why signing is slow)
To make side-channel attacks harder, SeedSigner mixes randomised dummy signing requests into real ones. Several settings control this in Settings → Advanced:
- Satochip pre-sign dummies (0–12, default 6)
- Satochip post-sign dummies (0–12, default 6)
- Satochip in-tx dummies (1–5, default 3)
- Satochip dummy probability (0–100 %, default 50 %)
Dummy operations carry no information about your transaction, so more dummies means slower signing but a less useful timing signal for an attacker. The defaults are a reasonable balance; the settings exist so you can trade speed against hardening.